Client-mode Product Integration
The Mobile Client SDK
We provide a mobile client SDK, which needs to be integrated into merchant's APP. And the SDK is available for both Android and iOS.
SDK Requirements
- Minimum OS version supported: Android 4.3+, iOS 8+.
- Permissions required: network and camera.
Integration Overview

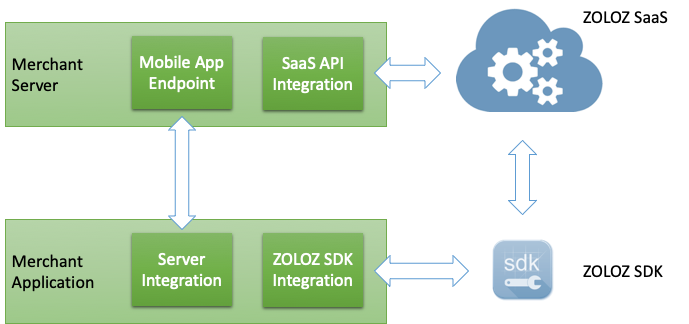
All client-mode products involve 4 anticipants:
- The merchant's server
- The merchant's mobile application
- ZOLOZ SaaS service
- ZOLOZ mobile client SDK
The customer must fully understand the whole interaction sequence before any integration attempt.
Overall Sequence

Detailed Steps
- Start business. A user starts the process (e.g. eKYC process) by requesting the mobile app.
- Get meta info. The mobile app asks ZOLOZ client SDK for meta info such as device model and operation system version as the preparation step.
- Return meta info. ZOLOZ SDK returns meta info to the mobile app.
- Initialize transaction. The mobile app sends initialization request to the merchant server together with the meta info retrieved from ZOLOZ SDK.
- Initialize transaction. The merchant server calls ZOLOZ SaaS service to initialize the transaction of the product (such as RealId) and passes along meta info.
- Return initialize result and client config. ZOLOZ SaaS service completes transaction initialization and returns result as well as corresponding client configuration prepared for ZOLOZ SDK to the merchant server.
- Return initialize result and client config. The merchant server returns the initialization result and client configuration to mobile app.
- Invoke with client config. The mobile app invokes ZOLOZ SDK with client configuration.
- Capture user data and upload. ZOLOZ SDK starts to interact with the end-user, capture required data and then upload. There might be multiple rounds of interaction between ZOLOZ SDK and ZOLOZ server.
- Process complete. The process is completed and ZOLOZ server returns the process status to ZOLOZ SDK.
- Inform completion with status. ZOLOZ SDK informs the completion of the process to the mobile app.
- Inform completion. The mobile app informs the merchant server about the process completion.
- Check transaction details. The merchant server asks ZOLOZ SaaS service for transaction details.
- Return transaction details. ZOLOZ server returns details to the merchant server.
- Confirmed. The information from the mobile app is confirmed by the merchant server.
- Inform completion. The mobile app tells user that the process is completed.
Server-side Integration
The merchant's server needs to provide proper endpoint for the merchant mobile application to create a transaction, as well as fetch the final result of the transaction.
Similar with integrating APIs of server-mode products, ZOLOL API SDK helps a lot by easing the gateway protocol implementation. In this document we only demonstrate how to integrate with ZOLOZ API SDK. If you want to integrate ZOLOZ SaaS API without API SDK, you need to fully understand ZOLOZ gateway protocol, properly create the request and handle the response by yourself.
Integration Steps
1. Introduce API SDK
Introduce the library into your project by adding following dependency in the POM file of your project
<dependency>
    <groupId>com.zoloz.api.sdk</groupId>
    <artifactId>zoloz-api-sdk</artifactId>
    <version>0.1.0</version>
</dependency>
2. Instantiate and Configure API SDK Client
// initialize OpenApiClient
String clientId = "<Client ID>";

String zolozPublicKey = "<ZOLOZ's public key content encoded in base64>";

String merchantPrivateKey = "<The merchant's private key content encoded in base64>";

OpenApiClient client = new OpenApiClient();  // construct with signature and encryption by default
client.setHostUrl("https://sg-production-api.zoloz.com");
client.setClientId(clientId);
client.setMerchantPrivateKey(merchantPrivateKey);
client.setOpenApiPublicKey(zolozPublicKey);
//client.setSigned(false);     // signature (of response) validation can be turned off
//client.setEncrypted(false);  // encryption can be turned off
3. Expose Endpoint for Client Application
@RestController
@RequestMapping(value = {"/webapi"})
public class NativeClientModeController {
    private static final Logger logger = LoggerFactory.getLogger(NativeClientModeController.class);
    @Autowired
    private OpenApiClient openApiClient;
    @RequestMapping(value = {"/realid/initialize"}, method = RequestMethod.POST)
    public JSONObject realIdInit(@RequestBody JSONObject request) {

        logger.info("request=" + request);

        String metaInfo = request.getString("metaInfo");
        String businessId = "dummy_bizid_" + System.currentTimeMillis();
        String userId = "dummy_userid_" + System.currentTimeMillis();

        JSONObject apiReq = new JSONObject();
        apiReq.put("bizId", businessId);
        apiReq.put("flowType", "REALIDLITE_KYC");
        apiReq.put("docType", "00000001003");
        apiReq.put("pages", "1");
        apiReq.put("metaInfo", metaInfo);
        apiReq.put("userId", userId);

        String apiRespStr = openApiClient.callOpenApi(
                "v1.zoloz.realid.initialize",
                JSON.toJSONString(apiReq)
        );

        JSONObject apiResp = JSON.parseObject(apiRespStr);

        JSONObject response = new JSONObject(apiResp);
        response.put("rsaPubKey", openApiClient.getOpenApiPublicKey());
        response.put("transactionId", apiResp.getString("transactionId"));
        response.put("clientCfg", apiResp.getString("clientCfg"));
        logger.info("response=" + apiRespStr);

        return response;
    }

    @RequestMapping(value = "/realid/checkresult", method = RequestMethod.POST)
    public JSONObject realIdCheck(@RequestBody JSONObject request) {

        logger.info("request=" + request);

        String businessId = "dummy_bizid_" + System.currentTimeMillis();
        String transactionId = request.getString("transactionId");

        JSONObject apiReq = new JSONObject();
        apiReq.put("bizId", businessId);
        apiReq.put("transactionId", transactionId);

        String apiRespStr = openApiClient.callOpenApi(
                "v1.zoloz.realid.checkresult",
                JSON.toJSONString(apiReq)
        );

        JSONObject apiResp = JSON.parseObject(apiRespStr);

        JSONObject response = new JSONObject(apiResp);
        return response;
    }
}
Example of A Minimum Merchant's Server
Check open-sourced examples in our Github repository:
Please note that the biz server needs to work together with our demo app.
API Specification Reference
Refer to RealId API specification for more information.
Client-side Integration
Android Integration
1. Configure Maven Repository
Add following maven repository configuration to your build.gradle:
maven {
    url  "https://dl.bintray.com/zolozclient/release"
}
2. Add Dependencies
In your module's (app-level) Gradle file (usually app/build.gradle), add ZOLOZ SDK as dependecy:
implementation 'com.zoloz.android.build:zolozkit:1.0.+'
implementation "com.squareup.okio:okio:1.7.0@jar"
implementation "com.alibaba:fastjson:1.1.68.android"
3. Get Meta Info
String metaInfo = ZLZFacade.getMetaInfo(applicationContext);4. Initialize RealId
Send the meta info to your server, and call RealId initialize API with meta info from your server to obtain the runtime configurations.
5. Start SDK
Construct ZLZRequest object with clientCfg returned from RealId server and public key generated by your biz server :
ZLZRequest request = new ZLZRequest();
request.bizConfig = new HashMap<>();
request.bizConfig.put(ZLZConstants.CONTEXT, this);
request.bizConfig.put(ZLZConstants.PUBLIC_KEY, publickey);
request.bizConfig.put(ZLZConstants.LOCALE, locale);
request.zlzConfig = clientCfg;
return request;
Start the ZOLOZ SDK with ZLZRequest and you need to implement the callback functions to handle the eKYC outcome:
ZLZFacade.getInstance().start(request, new IZLZCallback() {
    @Override
    public void onCompleted(ZLZResponse response) {
    }
    @Override
    public void onInterrupted(ZLZResponse response) {
    }
});
The eKYC outcome only contains a simple code demostrating the status of the eKYC process, you have to call RealId checkResult API to get detailed information of the eKYC process.
6. (Optional) Proguard
Add the following configuration to the project's confusing file:
-dontwarn com.zoloz.**
-keep class com.zoloz.zhub.**{
  <fields>;
   <methods>;
}
-keep class com.alipay.zoloz.**{
   <fields>;
   <methods>;
}
-keep class com.alipay.android.phone.zoloz.**{
   <fields>;
   <methods>;
}
-keep class com.alipay.biometrics.**{
   <fields>;
   <methods>;
}
-keep class com.alipay.bis.**{
   <fields>;
   <methods>;
}
-keep class com.alipay.mobile.security.**{
   <fields>;
   <methods>;
}
-keep class com.ap.zoloz.**{
   <fields>;
   <methods>;
}
-keep class com.ap.zhubid.endpoint.**{
   <fields>;
   <methods>;
}
-keep class com.zoloz.android.phone.zdoc.**{
   <fields>;
   <methods>;
}
-keep class zoloz.ap.com.toolkit.**{
   <fields>;
   <methods>;
}
-keep class com.zoloz.builder.** {
   <fields>;
   <methods>;
}
iOS Integration
1. Configure Dependency
Configure private spec in Podfile:
source "https://github.com/zoloz-pte-ltd/zoloz-demo-ios"
Add dependency in Podfile:
pod 'zolozkit'2. Install Dependency
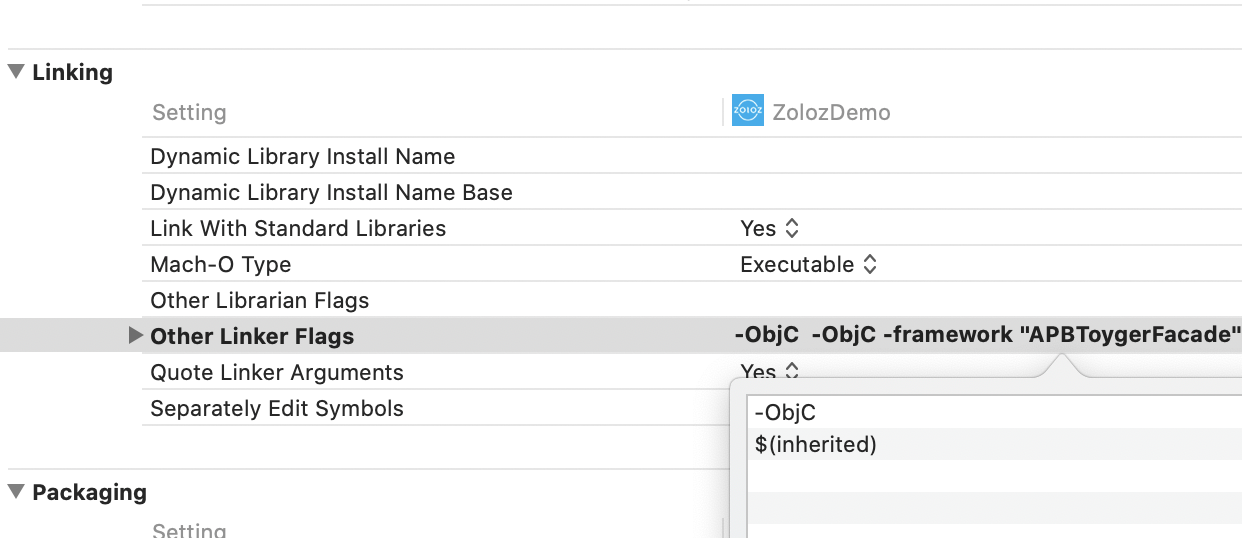
pod install3. Configure Linker Flags
Add -ObjC and $(inherited) in "Other Linker Flags"

4. Get Meta Info
NSString *metainfo = [ZLZFacade getMetaInfo];5. Initialize RealId
Send the meta info to your server, and call RealId initialize API with meta info from your server to obtain the runtime configurations.
6. Start SDK
Construct ZLZRequest object with clientCfg returned from RealId server and public key generated by your biz server :
NSString *clientConfig = clinetCfg;
//.pass the current ViewController to bizConfig
NSMutableDictionary *bizConfig = [NSMutableDictionary dictionary];
[bizConfig setObject:self forKey:kZLZCurrentViewControllerKey];
//.pass the public key to bizConfig
[bizConfig setObject:publicKey forKey:kZLZPubkey];
//.pass the locale to bizConfig
[bizConfig setObject:locale forKey:kZLZLocaleKey]
ZLZRequest *request = [[ZLZRequest alloc] initWithzlzConfig:clientConfig bizConfig:bizConfig];
Start the ZOLOZ SDK with ZLZRequest and you need to implement the callback functions to handle the eKYC outcome:
[[ZLZFacade sharedInstance] startWithRequest:request completeCallback:^(ZLZResponse *response) {
} interruptCallback:^(ZLZResponse *interrupt){
}];
The eKYC outcome only contains a simple code demostrating the status of the eKYC process, you have to call RealId checkResult API to get detailed information of the eKYC process.
Examples of Demo Apps
Check open-sourced demo app in our Github repository:
Please note that the demo apps need to work together with our biz server.